Car drive make in animation kit
How to do Car or vehicle drive rigging in Maya?
Once completed the model of the car moving animation. The next step has to give controllers, speed, rotation and key.
First step is giving the controllers to 3d car animation or vehicle model of object, for controllers have to take from “Curves”. It is the top of the menu bar like as “NURBS Circle: Create a NURBS circle on the grid”.
The NURBS Circle have to draw near the object of the Car or vehicle to control the car. You have to do different controllers to operate the car. You already know that for every vehicle have to control like as in car have steering, break, clutch, front and back light and horn.
Aim: A car and three controllers to run or drive the vehicle with rigging.
Procedure: There are three controllers such as, first controller for steering, second controller for car body control and third controller for Position control.
Used tools: Add Attribute, Expressions, Set Driven Key and Graph Editor in Maya.
Description: The car or vehicle with three controllers has done. The further step is to rotate the Tyre of the car by using the respective controllers. For Tyre have to give the speed range. We need to add the speed then go to “Channel Box or Layer Editor”. There has option is “Edit”, click Edit and from drop-down list select the “Add Attribute”, then you will appear or display one wizard of Add Attribute, in this you need to mention the name field like as “Long name”.
After that go to the car model and select the car one of the Tyre to rotation. You must know that which direction is move the Tyre. Actually, move direction is rotate x from channel box. In the channel box select the rotate x and go to Edit and select the “Expression”. |
Remember you must select the channel box of rotate x or y or z whatever it is, you have to select from channel box then only active the Expression tool.
After select the Expression tool then you will appear or display the wizard of expression. Here you need to give small script or expression MEL (Maya Embedded Language).
Expression: Back_tyre_L.rotateX = position.rotation * position.speed;
Back_tyre_L is your car Tyre name.
Position is your car position controller name
Rotation is your Tyre directions
Speed is your Tyre speed range like speed or slow (-100 to 0 to 100).
Note: expression script is case sensitive.
You need to give separate for every Tyre, as we know for car has four Tyre.
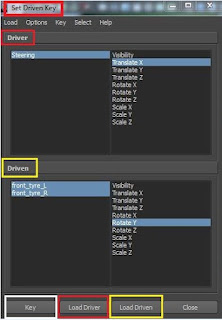
After this then go to menu bar and select Key and in drop-down list select Set Driven Key and go to Set and select it. You will appear the wizard of Set Driven Key.
Go to car model and select the steering controller after that go to Set Driven Key wizard there need to select “Load Driver”. And again, go to car model and select the front Tyre to operate left and right turn purpose. After selecting the front Tyre, go to the “Set Driven Key”, wizard and select “Load Driven” and give auto key at timeline. Do as many you want to operate by selecting timeline set key “S” and also timeline range from 0 to 750 to move the car. |
If you have problem with speed of vehicle, then go to Graph Editor from menu bar select “Window” from drop-down list select “Animation Editors” in this option you need to select “Graph Editor”. The Graph editor shows you the speed or travel of object with graph.
Here you need to operate or adjust the frequency of speed or continue run purpose, in this graph editor have some best tangents like as Spline tangents, Clamped tangents, Linear tangents, Flat tangents, Step tangents, 3d car animation and Plateau tangents. |
Computer stuff kit tricks of Topics 17.
Lighting in Maya - Need to light “ON” by press the key “7”
Rigging in Maya - The main one is Joint Tool, Ik Handle Tool.
Color settings in Maya - Color is to give the beauty of character.
Glass in Maya - The entire glass you have to draw EP curve.
Render settings in Maya - For best quality settings can use HD720 videos.
Short film creating method - We should take nice place to create stories.


Comments
Post a Comment