Showing posts with label Maya software. Show all posts

Sunday 17 July 2022

3D Character modeling


How to make 3D Character modeling in Maya?

The character modelling is very tough to learn, but if you have passion and zeal, then you can make character modeling it is easy to do. You can go through our previous topics about 3D modeling, rigging, rendering, texturing of Maya tutorial of simple character model.

Character model in Maya, Rigging in Maya, Animation Tutorial
3D Character modeling | Screenshot - 1

First we need one image of human body like, neck, chest, hands, stomach, hips, legs and foot. It require two side human body to develop character model (Maya character modeling reference images).

Images, stomach, hips, legs, Maya tutorial stuff
3D Character modeling | Screenshot - 2

As we learn earlier about how to import image in Maya application, Import the image in the Front view panel and adjust it as per your requirement. After imported image then take square polygon object and start from neck to chest to hands, chest to stomach to hips to legs to foot.

Character rigging in Maya, Maya tips, Animation tips, Stuff
3D Character Rigging | Screenshot - 3

After created modeling then do texture the body with color settings, after that we need to make rigging the character by using some joints and Ik handles.

After fixed the joints from foot to neck or head, here we need to require accurate settings with axis like X, Y and Z. Some axis are shows other angles, so we need to change the orientation  or other tool like cometJointOrient();

MEL script Editor, MEL language, Character Rigging
3D Character Rigging | Screenshot - 4

The main important is correct axis point have to change it. The cometJointOrient need to download from internet and save it in to your computer, then go to Maya application and click the right side MEL and select Script Editor menu and upload the file name as “cometJointOrient” from your computer storage, then after go and type the script as “cometJointOrient ();” and press enter, after that you will appear one wizard with name as “cometJointOrient” as above Screenshot-4.

Here you need to start or test the axis point direction and change it as per your requirement.

Animation stuff, 3D Modeling, Rigging
3D Character Animation | Screenshot - 5

The cometJointOrient is essential to your task to get accurate rigging the character modeling for animation project.

If you want to know more about the subject of animation or Maya tips then go and search in search box and key the words of your related information subject.


Computer stuff kit tricks of Topics 30.


Glass in Maya – How to make Glass in Maya and usage method.

Lighting in Maya – Lighting for Animations by using options on lights.

Camera setup in Maya – How to insert camera in Maya.

Color settings in Maya - An object can make life of animation.

How to do Hills and Tree rendering


How to create hills and tree rendering images?

The modelling can make objects like, chair, table, trees, leaf, hills, and so on… Modelling can do with 3D software like, Maya, Blender, Substainer, 3D Max, Modo, Carrara, massive, Seamless3D, Art of Illusion, POV-ray, K-3D, FaceGen, 3D Movie Maker, Imagine, SketchUp, Nuke and many more.

The best quality of animation or images can do in Maya application with some tools like polygon sphere, square, plane, cylinder and pipe. If you want to make hills and a tree then need to go menu list and select “plane” and scale it as per your requirement place.

Maya tutorials, Hills rendering, Animation Technical Stuff
Screen shot-1 | Plane | Extrude

Now you need to create hills, then select option is “Face” and where you want to make hills see the screen shot for your reference. Which are selecting the area and take option is to “Extrude” to take upwards like small or medium or high size of hills.

3D Modelling, Nuke, Blender
Screen shot -2 | Smooth | Press-3

The 3D view can check thoroughly how it looks when creating a video or render the images. Once created hills with the requirement then need to press key “3” for smooth. You can also keep lighting near the place like point light, area light, spot light and volume light. The most important accurate of the lighting part have every aspect of your project.

Images, reflections, attribute
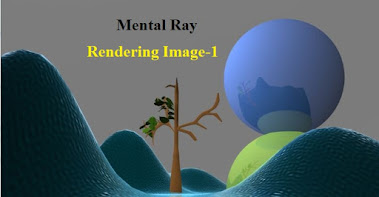
Screen shot - 3 | Mental Ray | Render image - 1

If you want hills with water or ocean then go to “OceanShader” to create it. You need to do some attribute of particular item to reflect or refraction of any object to look beautiful or nice images. In the attribute or short cut key is (Cntrl + A) to get wizard of particular object settings.

Rendering images, Display, Object settings
Screen shot - 4 | Mental Ray | Render Images-2

Need to do little bit experiment in channel box of feature adjustment making such object reflections point.

As we know after all created the best part is Display render settings to get output of your project. Let’s check in “Display rendering settings” for your reference purpose.

Quality, Maya tutorial, Computer
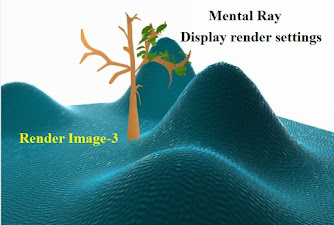
Screen shot - 5 | Mental ray | Render Image-3

The HD images or quality videos based on pixel resolutions to get good quality. See some rendering images of mental ray settings option in Maya applications. Some are with light effects, trees, ocean waves and many more. The quality comes with pixel width and height of image.


Computer stuff kit tricks of Topics 28.

Camera setup in Maya - Create the stories with story board.

Rigging in Maya - The main one is Joint Tool, Ik Handle Tool.

Glass in Maya - The entire glass you have to draw EP curve.

Lighting in Maya - Need to light “ON” by press the key “7”

Color settings in Maya - Color is to give the beauty of character.

Photoshop and Tool  - For best quality settings can use HD Images.


How to do 3d model of eyeball


How to make eyes 3d models in Maya?

The modeling 3d model of human eye of any object is required some reference images to develop the object structure, then need to do that go and search in internet and collect images with key word as “eyes transparent 3d modeling images” and download the images into your desktop or storage hard drive to use as reference in the Maya application modeling part.

head modeling in maya, Animation Technical Stuff, eye ball model
Screenshot-1 | Maya eyeball

Now open the Maya application software from your desktop which already installed Maya software.

After this go to save and give file of your project name ex: (modeling eye.ma) and in the application have four views, here select the front views to import the reference image which already downloaded from the internet. It is useful for reference image to develop the object with Maya tools.

Now go to perspective of 3d view and go to the Polygon tool and select the “Polygon Sphere”, and press “3” for smooth and press key “5” for grey color to object visibility.

eye ball model, 3d modeling eyes, stuff
Screenshot-2 | Polygon Sphere

Again select the object and press key “E” to rotate the object as per your requirement and go to attribute or channel box and select “Rotate X” then give number as (90 or -90) to look like eye ball.

photoreal eye, maya eyeball texture, stuff
Screenshot-3 | Object color settings

Now select the object and press right click with hold and select “face” option to select object area as circle, to know clear reference see the screen shot for your reference.

Maya eyeball texture, Maya Procedural Eye, stuff
Screenshot-4 | Final output Eyes rendering image

Before this give object with full color is “White” with type “Phong” and remaining selected circle area with color is black and other one is brown color in center place. See the screen shot to know the “Maya Procedural Eye” final output.

For Maya eyeball , realistic eyes Maya, Maya eyeball texture, eye ball model, 3d model of eyeball, 3d modeling eyes.


Computer stuff kit tricks of Topics 29.

Camera setup in Maya – How to create animate video film.

Lighting in Maya – What type of lighting are there in maya.

Color settings in Maya – How to make object with color.

Render settings in Maya – What is the render settings of quality image or video.

Polygon Sphere in Maya – What is polygon Sphere in maya application.

Rigging in Maya – How to do rigging in maya application.

Glass in Maya – How to make glass in maya software.

What is Polygon sphere in Maya


What is Polygon Sphere in Maya?

The Polygon is also called as shape, not some other shape. The polygon shapes like rectangular, Convex, Simple, Concave, Equilateral, Regular convex, Regular star, Equiangular, Cyclic, Square, Circle, Oval, triangle, diamond, trapezoid, parallelogram, star, pentagon, hexagon, heart, octagon, crescent and arc.

If you have started with polygon for an object like table, chair, weapons, house, trees, etc., then mostly use in the software application that is: Mesh and Edit Mesh. In Mesh have Smooth, Combine, Separate and Fill hole. The Edit Mesh is most important Extrude, Interactive Split Tool, Insert Edge Loop Tool and Offset Edge Loop Tool.

In the Maya application have plenty type of shapes to develop the modeling with the polygon shapes. If you have knowledge on geometry part, you can do the modeling part, as we know that polygon is a two dimensional or plane figure, with at least three straight sides like triangle and angles, typically have five or more…

For better understanding, then see the below screenshot for your reference from Maya application about Polygon Shapes.

Sphere, Square, Cylinder, Cone, Plane, Torus, Animation Technical Stuff
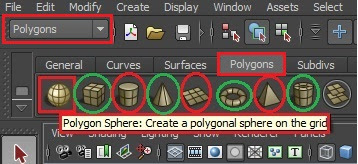
Menu bar | Polygons | Sphere | Screenshot-1

First go to menu bar and select the option as “Polygons”, then go to near below have some shapes like, Sphere, Square, Cylinder, Cone, Plane, Torus, Pyramid and Pipe.

Now select the polygon of Sphere and go to four view and select perspective, then see the Sphere in the Grid, here taken three Spheres and one plane for surface.

The polygon of Sphere and go to four view
Perspective view | Three Spheres | Screenshot-2

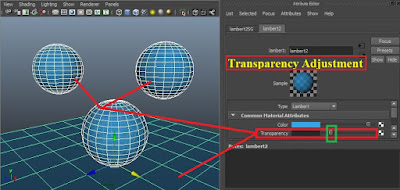
You need to adjust with manipulator to place the object as per your requirement. After that need to color the object, then click the Color for more information. See the below screenshot about how to do adjustment for transparency to the sphere objects with green color highlighted area to move one place to another place.

Color settings in Maya, Transparency adjustment
Object color settings | Transparency adjustment | Screenshot-3

The final part is rendering the object through click the “Display render settings” to get the best quality of output of image. See the below screenshot of rendering the image quality by using lights effects and reflections settings to get accurate.

Best quality of image, Render settings, Image high resolutions
Rendering HD image | Screenshot-4

After rendering the image with HD quality, it will use for films or posters, wallpapers, gallery, image editing for personal use and many more…


Computer stuff kit tricks of Topics 27.

Camera setup in Maya - Create the stories with story board.

Rigging in Maya - The main one is Joint Tool, Ik Handle Tool.

Glass in Maya - The entire glass you have to draw EP curve.

Lighting in Maya - Need to light “ON” by press the key “7”

Color settings in Maya - Color is to give the beauty of character.

Render settings in Maya - For best quality settings can use HD720 videos.

Short film creating method - We should take nice place to create stories.

What is rig an arm in Maya


How to do rig an arm in Maya?

Rigging is for operate the body actions to move one place to another place, it is entire of a body character has to create for animation for animator purpose Maya joint

The rigging artist can work on limbs and squash to controls the body or objects or weapons, where you needed to give the animators the ability of exaggerate their animations can do.

First select body character parts; let’s take arm to rig the animation.

Maya application, Rigging making, animation rigging
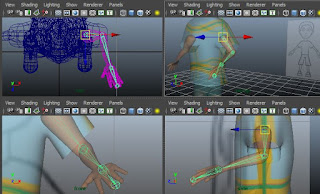
Rigging Artist | Screen shot 1

Go to skeleton and select Joints option to body character for arm part, starting point is arm, elbow, right wrist, and Pam of hand. Once given the joint in three D view point, then select the body character and select the joint and go to skeleton then take Bind skin option then select the Smooth Bind option. 

Animation tips, computer rigging, Maya tutorial
Rigging Artist | Screen shot 2

Character have X-ray is required to do rigging the character. How to create joints for you What is the most important thing we have given in Axis.

Review is a very important thing that we can animate a man or an object or a cloth through which we can identify a short film can be filmed by us Maya Application Software front back side can be done properly by in any position by joints print. All we have to do is select the animation option once it is fixed and then go to the scheme and select it and then the body parts will be dining then you can root through the excise.

Animation tutorial, X-Ray rigging, Skeleton joints
Rigging Artist | Screen shot 3

X-ray should be selected which means we have to select the front view and go to the user and there will be different options which are the frame setting. Wire frames, Smoothing Shade All, Smooth Shade Selected Items, Flat Shade All, Flat Shade Selected Items, Bounding Box, Points, Use default materials, Wire-frame on Shaded, X-Ray, X-Ray Joints, X-Ray Active Components, Object Transparency Sorting, Polygon Transparency Sorting, Interactive Shading, Back faces Culling, Smooth Wire-frames, Thicker Lines and so on…

Computer kit, Animation kit, Rigging kit
Rigging Artist | Screen shot 4

Rigging is a very important thing. Animation must come properly. Rigging controls must be created. Global control must be created. Master must create global control. Create. Create controls. To make it realistic it is the use of animators they make controls for neck and small size for nose, lips, hands, hips, legs, knees, ankle, toe, etc., here in this tip only for hand move through joints. For every movement is required the joints orientation, parent, Aim etc., you can make as per your requirement with this options, to move the object then select joints and make changes with orientation option.

Maya tutorial, Animation rigging, Maya rigging
Rigging Artist | Screen shot 5

The main point in this computer techniques kit suggest joints have to know the which axis moving the object, after you have created the joints, it shows different axis for hands left and right, legs left and right, neck and head. Which you need to create circle or square or rectangle curves. The main curves for eyes also required the joints to rotate the object. You have to know the locator option; need to create the rigging for every part.


Computer stuff kit tricks of Topics 23.

Lighting in Maya - Need to light “ON” by press the key “7”

Color settings in Maya - Color is to give the beauty of character.

Camera setup in Maya - Create the stories with story board.

Rigging in Maya - The main one is Joint Tool, Ik Handle Tool.

Glass in Maya - The entire glass you have to draw EP curve.

Car drive rigging in Maya - Add Attribute, Expression, Set Driven Key.

Render settings in Maya - For best quality settings can use HD720 videos.

Stories creative – How to create stories and do animation for shot films


What is ocean shader in Maya


How to do water of ocean or river in Maya?

Animation need mainly to create the atmosphere or feel to create through rain, water of ocean or river. It is slightly difficult to create the Maya water.

For water of ocean or river, you should need computer configuration such as, display size should be 20 inch, 30 inch, graphic chord with 1GB, 2GB etc, processor AMD, Intel i3 to i10 supported mother board, RAM should be minimum 4GB to 32GB or 64GB. This is very important is which the bit of operating system (Windows OS) such as 32-bit, 64-bit.

To create the ocean or river, then you should be use the 64-bit operating system. It gives the best quality of output the video or render images with HD quality Maya ocean shader pink.

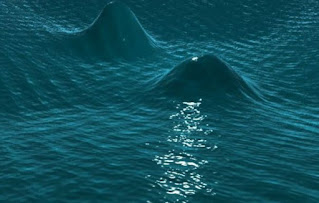
The below screenshot 1 is the ocean render of HD image with light effects. It was looking like as moon light or rise falling on the water or ocean, and also have been flowing the water. It all fixed in the option called “Ocean Shader” - how to create a river in maya.

HD image, animation tutorial, technical tips
Screenshot 1 | HD Image

The ocean shader default with color light blue, if you want to change the water, then you can do it yourself. The best to select image or video by developed through “Mental Ray” or “Render display settings” wizard.

Take a simple example is, first create one “Plane” from Polygon or from menu bar select “Create” and drop down option select Polygon, named with “Plane” option.

animation tutorial, maya tutorial
Screenshot 2 | Polygons | Plane

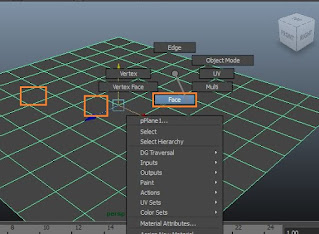
Here, screenshot 3 look with one square plane created, after that you should need to select the Plane object and click the right button from the mouse, then after you will get some options like, Edge, Vertex, Vertex face, Face, Multi, UV and Object mode. These option tools are very and every time useful to create any kind of things you can do it.

animation maya tutorial, maya subject
Screenshot 3 | Face tool

Here, select the “Face” and go to Plane object and make alternate or any two box have to select and press “W” to move up as you want to require the height. After you need to press the key “3”, for smooth the plane. Once see the screenshot 1 shape like hill or mountain with water.

The ocean shader, have to create then, select the plane object, right click continue with hold and select “Assign New Material”, then after, will get one option menu list, here you need have to select the option of “Ocean Shader”.

channel box maya, maya tutorial
Screenshot 4 | Assign New Material

In the “Channel Box” or press “CNTRL+A”, you will find about the ocean shader settings with scale, wind UV, wave speed, observed speed, Num frequencies.

animation settings, ocean shader
Screenshot 5 | OceanShader settings

You need to remember that, if you want waves then go to play the timeline from right side have play button.

render settings, HD quality, maya stuff
Screenshot 6 | Render-mental ray image

When you have play, from time line range should be 0 to 256 or 300 frames, then after start to create waves in planes, don’t forget to give light option of “Volume light” or “Area light”, and want light to “ON” then press key “5, 6 and 7”.


Computer stuff kit tricks of Topics 2.

Short film creating method - We should take nice place to create stories.

Lighting in Maya - Need to light “ON” by press the key “7”

Color settings in Maya - Color is to give the beauty of character.

Camera setup in Maya - Create the stories with story board.

Rigging in Maya - The main one is Joint Tool, Ik Handle Tool.

Glass in Maya - The entire glass you have to draw EP curve.

Render settings in Maya - For best quality settings can use HD720 videos.


Why Stories Important


What are the uses of stories?

Importance of short stories of our life and not every man in general understands it properly. To say that an event has been shaped to describe an event is to start the story so that it is for every man.

What is going to happen in the future will be known in our stories importance of stories in education.

animation stories, tell stories, best stories
Why stories | Story Image-1

Those, who make sense with leather dolls when we don’t understand them properly, we learn a lot from stories and even think of unknown things in form. When we don’t understand when any problem comes up we say tell some events to make sense on them.

Stories need more young children because they know nothing what the brain will be very lovingly told Moon stories, Fables Struggling (a short tale to teach a moral lesson), Stories Difficulty and Rhymes are poems that are understandable to young children.

When we do not understand our life properly, we take stories like Ramayana, Mahabharata, and Bhagavatam to solve our problems.

Imaginary story, Animation story, goodness
Nature | Story Image-2

Simply put, the goodness of a value of asset in the story and it brings a healthy peace of mind. Stories are what every man needs through which we got out of trouble. Some people have to explain very carefully when they do not understand properly.

Stories lead our lives because of the way we reach the top and what kind of stories we need to direct. Every day we need to know each and every one of them so that we can correct our life with stories.

Some of the stories, we use in the form of music or songs etc., we use to know what we mean and how we feel.

Each of us changes in difficult form. We learn this story of his in our life when someone does not understand properly

If we want to know the stories, in the market or online store available, we should bring story books and read this evening or morning or free time to get knowledge or wisdom.

Every man must know that everything about the life stories, in order to increase knowledge is our life with the stories.

What we mean by animation these days is that our old childhood stories in the form of animation about short films through Maya software, we can create with motion graphics or 3D Software's.

If we want to be a scientist, our parents to remind us about Abdul Kalam, Bill Gates, Albert Einstein and many more.

When we are in depressed our friends, relatives and parents tell us some stories and take care of our suffering to come out the depression.

These days, short films are being made with animation software’s to tell the story. Rhyme poems are made for children with animated video or short films.

Animation software, Maya tutorials, Stories pics
House water with moon | Story Image-3

We needs to know in advance, how to be good with someone in order to be disciplined through stories only.

The stories is most important of our life, it gives solutions and perfection of our life. If you don’t understand clear or confusion, then start reading or write stories to overcome from situations.

Now, we clear know about the concept of “why stories” important of our life.


Computer stuff kit tricks of Topics 22.

Lighting in Maya - Need to light “ON” by press the key “7”

Color settings in Maya - Color is to give the beauty of character.

Camera setup in Maya - Create the stories with story board.

Rigging in Maya - The main one is Joint Tool, Ik Handle Tool.

Glass in Maya - The entire glass you have to draw EP curve.

Car drive rigging in Maya - Add Attribute, Expression, Set Driven Key.

Render settings in Maya - For best quality settings can use HD720 videos.


How to do lighting in Maya


How to use Lights in Maya?

Lighting in Maya is for to view the object in darkness or night time. In the films, we use lighting for scenes and beautiful look. It creates the wonderful look for every scene. It is essential for animation films, in the animation have the software, may have different lights. Let’s start the light creating on the object or background affects settings.

First introduction to lighting in Maya take the object in the three D view and give a color to the object. If you want to know about that, how to “color the object” click on it.

animation lighting, lighting camera stuff
Screenshot 1 | Sphere Object

After colored on the object, here taken the color was “blue”, then after go to menu bar and select the “create” and have drop down list and select the “Lights” and go and select the “Point light”. If you want other lights like Ambient light, Directional lights, Point light, Spot light, Area light and Volume light.

Point light, Directional lights, Area lights, Volume light, Spot light.
Screenshot 2 | Lights

Mostly, use the light in the animation projects is the best way is “Point light” and “Directional light”.

After selected the “Point light” then, go to three D view and appear like small light symbol with red color.

light reflect, animation light stuff
Screenshot 3 | Light ON

After that, select the point light and move to nearest place, you want to look the object. After that, you need to light “ON” by press the key “7” from the keyboard. It will glow light around the object with good look or beauty of nature.

If you want to change the “Intensity” of the color of light, then select the light and press “CNTRL + A” then after, you will get on the right side will get the related about the light attribute. Here, have the color and intensity. You can know adjust the intensity by use the adjustment through arrow.

intensity color, light color animation stuff
Screenshot 4 | Light Intensity

If you can change the light color then click on color tab with white color, after click it you will appear the entire color settings will get. As per your requirement, you can change the color light of your task.

Intensity, color attribute, color settings, pixel stuff
Screenshot 5 | Light color adjustment

While doing the light on the object, you must aware on the render settings, in the render settings is give the quality of the HD image or HD video output.

After render settings did well, and then you can check the render every time about the quality of the HD image or video scenes with low quality like 320 pixel or 640 pixel, use frequently to get best output, after you feel good one, then change the quality to HD like HD 720, HD 1024 or 2024 of final output.


Computer stuff kit tricks of Topics 5.

Color settings in Maya - Color is to give the beauty of character.

Camera setup in Maya - Create the stories with story board.

Rigging in Maya - The main one is Joint Tool, Ik Handle Tool.

Glass in Maya - The entire glass you have to draw EP curve.

Render settings in Maya - For best quality settings can use HD720 videos.

Short film creating method - We should take nice place to create stories.

Car drive rigging in Maya - Add Attribute, Expression, Set Driven Key.


What is the color settings in Maya

How to use Color settings in Maya?

Maya display settings color is to give the beauty of character, house, set design, table, chairs, cloths, shirts, hairs, lips, eye’s, trees, land, surface, water, rock, materials, weapons, vegetables,  fruits, etc.

Color is the characteristic of visual perception Maya color space, it has described through color categories, with the name of like Orange, Red, Yellow, Green, Blue, Purple. The quality of an object or light of reflected by the object. It is normally use to define by visually by measurement of hue, saturation, thickness, brightness of the reflected light.

For every object or item have different usage of color. In the Maya applications have to give life or beauty of any object or materials. Let’s see few steps in color to object.

maya 2022 color management, maya change selection color
Screenshot 1 | Assign New Material

First create any object in Maya application here, we had created the sphere, after select the sphere and click the right button from mouse then select the “Assign New Material”. You will appear one coloring tool, here select the “Lambert” or any kind of options as per your requirement, like as Anisotropic, Blinn, Cgfx shader, Hair Tube Shader, Lambert, Layered Shader, Ocean Shader, Phong, Phone E, Ramp Shader, Shading Map, Surface Shader, etc.

color settings, maya tutorial
Screenshot 2 | Lambert

If you consider any of above color options, you have to configure the measurement of color the object. Color is the essential subject of the project. It creates and identification of the incident or events. Some of options are very sensitive settings with Phong, Ramp Shader and Ocean Shader.

animation subject, maya subject
Screenshot 3 | Color type

If you select the “Lambert” then you will appear right side above object coloring feature. Click on the “gray” color, then you will get full color related things, you can give any color as per your requirement. In this color settings need to focus on the object to get the best quality of the animation film.

color settings, object lighting
Screenshot 4 | Color adjustment

If you want to change the color reflection, then go to Type and click it you will get drop down list like as Blinn, Phong, Phone E. If you want to create water then select the “Ocean shader” and have to give lighting to reflect the water.

transparency glass, maya tutorials
Screenshot 5 | Type and Transparency

This is also belongs to your project to create the water like ocean or river along with light effects. For glass, glass table, object light reflections or refraction then, you need to select the option is Blinn, Phong and Phong E, you must select the Transparency option from the channel box.


Computer stuff kit tricks of Topics 6.

Lighting in Maya - Need to light “ON” by press the key “7”