Sunday, 17 July 2022

HTML Language

What is HTML?

HTML is a Hyper Text Markup Language, it is use for website design, image scrolling, button like social media many more. It can use in notepad tag like <html> <head> some text <body> some text here and close the code with </html> </body> </head>, the forward slash use for close or end the program.

html language, markup, hyper text
HTML Language - Image-1

For example you want to scroll the text with font size using like <H1> title </h1>, it is not have any case sensitive like C-language. You can experiment with your own html website design font size, images, button for social media.

The HTML is very much useful to view the concept of idea, web design so on. First open notepad and give HTML tag like <head> <title> <H1> some text </H1> </title> </head> next line <body> some text </body> and save the name as “sample.html” on desktop and open the sample.html file and view the HTML tag work.

A website required main title, paragraph, links, lines, scrolling, social media button, click OK button and many more feature can work on it. The simple language about the HTML scroll the image or loop the image based on website url links can work world wide web ie., www.example.com

It is useful when create a blog or website, you can manage with this blog, how tag can arrange based on our requirement. The HTML is main for web designing and also have <a url > link name </a>, <img src=image1.jpg” alt =”photo”> and div is for sidebar for content based <div> <h1> sidebar text </h1> next link <p> sidebar text </p> </div>.

It will have so many html tag can learn to better usage while making a website or blog, all are in html language may have other language also script language such as java Script. It is for web browsing and easily navigate the document or content for web pages and web application. It is main shows world wide web with the links and url. The code is used to structure a web page and its content, like structure of paragraph, a list of content posts or using images for web design.


Computer stuff kit tricks of Topics 34.

Fix the website browsing error - Proxy settings, Internet Properties, Antivirus.

Embedded systems - Micro controller 8051, SRAM, FLASH and EEPROM memories.

GSM / GPRS Tracking - Mobiledata 2G, 3G and 4G LTE cellular network.

Mobile Internet connection - Browsers like Google chrome, Mozilla Firefox.

Desktop or Laptop Troubleshoot - Monitor, Processor, Hard disk RAM and ROM.


Google cloud and DNS settings

What is google cloud and DNS settings?

The most powerful configuration in google cloud, which have given more options and settings as per our requirement of the projects, google cloud is a storage data, CPU configuration, Ram usage, processor speed, storage disk drive space and many more feature are available, but need some technical stuff to operate the google cloud platform.

It was launched on April-7-2008, written coding in Java, C++, Go, Ruby, Python, URL is cloud.google.com, The google cloud locations are Asia, North America, South America and Australia. The google cloud is use for web application, App engine and google hardware. The best is computer Engine, Cloud storage and BigQuery for free of charge, it is based on cost usage of services like, storage, ram speed, processor speed, etc.

DNS records, Host Name, DNS server
Cloud Project Name | Screen shot-1

Few settings to know about how to configure of cloud DNS settings, go to google cloud and provide login and password and after completed free credit step, then you will find the project name of your project, here available like Project name: xyz bill, Project ID: xyz-matter-123456, project number: 111111222222, this the information about your project (see screen shot-1).

global network, DNS Network, Cloud DNS
Cloud Network setup | Screen shot-2

Go to left top side corner and click drop-down list and get options are Recent, IAM & Admin, APIs & Services, Cloud storage, Network services, VPC network, Compute Engine and many more (see screen shot-2).

Cloud DNS, google search console, IP address
Network services | Cloud DNS | Screen shot-3

Here, we need to set up cloud DNS settings, before adding we need website or domain to mention the required filed and desire name to go further step. After select Cloud DNS here we need to give or create records such as mapping IP address, NS records, A, AAAA, CNAME, TXT, MX, etc.,

Cloud domain server, IP config, Mapping domain
Cloud DNS | Mapping | Screen shot-4

When mapping the IP address to your domain in few minutes it will provide google name servers, they are four name servers like ns-cloud-x1 to x4 store data of your domain and SOA store your domain in domain server.

Now, go to google search console and validate your URL with google cloud platform and provide TXT from google search console from settings select ownership verification of TXT copy and paste in cloud DNS by new create records select type TXT and paste in destination field Ex: “google-site-verification=xxxxxx1x3-1xxxxxxx12xyyyyy-xYxxx1xxx2342”, then go to google search console and press validate button, it show’s with green color as successful validated.


Computer stuff kit tricks of Topics 33.


Forward domain DNS settings

How to setup DNS settings to forward a domain?

Cname redirect to another domain is main root for your data to project your content or images or videos to publish and each and every one who have interested subjects or collect data such as like food, health, technical, computer troubleshooting, educational tips and tricks and so on.

Computer knows only machinery language, coding and some instruction developed through the high level language, middle level language such as C, C++, Java script, PHP, SAP, ORCALE, Dot Net, CSS, HTML, HTML5 and so on. There are lot of things have to setup a website and DNS settings to crawl,index, fetching data URLs through google search console data base.

First we need one topic to develop a website blog posts, for an example as we have taken title name as computer world, then after posted all related about computer such as PC hardware, computer hardware solutions, software tips, desktop tips, printer tips, mobile tips and etc., for basic understand purpose.

Now we need to do DNS settings for your website or your domain, after buy domain then need to do DNS settings such as custom resource records, Domain Forward, Glue records, Name servers and Mail MX.

In DNS settings first we required to mapping the IP address to your domain like example: google Domain here need to give IP address in the glue records from already allotted name server's as (ns1 or ns-cloud-d1.googledomains.com, ns2 or ns-cloud-d2.googledomains.com, ns3 or ns-cloud-d3.googledomains.com and ns4 or ns-cloud-d4.googledomains.com). Now go to Glue records and type host name as “ns1 or ns-cloud-d1” to IP-219.239.32.21 mapping.

After completed mapping to IP address. Example like House is Domain or website, in house have some rooms, like bed rooms, hall, kitchen, drawing room and guest room. It also same like Domain forward settings, to give subdomain name like inside house rooms, based on your website content or posts data, pick names or word from website content like computer, PC, tips, blog, printer, scanner, so on as per your requirement.

forward DNS records, web forwarding, DNS records
Synthetic records | Screen shot image-1

Now go to Domain forward DNS settings in google domain or registered domain with login and password to enter for DNS settings.

Go to Synthetic records and give subdomain field as example: PC and give in destination URL is example: https://www. Example..com before doing click on “Add” button, see options like Temporary redirect (302) or Permanent redirect (301) selection part. If select temporary redirect (302) means store in server in few time and clear the data in server, if select permanent redirect (301) it store permanently in server or data base. Select any as per your decision and click on Add, after 24 or 48 hours it will redirect from subdomain name to https of your website.

Canonical Name, ALIAS Records, URL Redirect
Domain forward-Cname | Screen shot image-2

Then, you will complete redirect from subdomain see in Domain forward and available with CNAME type and google total configure out of your subdomain (see screen shot image-1).

DNS servers, configuration, DNS forwarding
DNS Forward settings | Screen shot image-3

If you want to add more then select in Domain forward and click on “Manage” (see screen shot image -2) then, get already configured wizard see bottom and click on “Edit forwarding”(see screen shot image-3), then select “Advanced options”(see below screen shot).

redirects, Redirecting, DNS server configuration
Https Redirect type | Screen shot image-4

As we know Redirect Type select as per your requirement either select Permanent redirect (301) or Temporary redirect (302) (see screen shot above) and scroll down select “Path Forwarding” have two options like and “Forward path” and “Do not forward”, best to select any option and don’t change default settings then, click on “Forward” option (see below scree shot image-5).

Configuration, directory, DNS names
DNS settings path forward | Screen shot image-5

It will take with in one or few hours it will ready to redirect from subdomains (Subdomain can create up to 100 label/names, when creating subdomain first time it will take time to redirect need to wait for 24 hours then, after want to add more it will change with in few hours to redirects new subdomains).


Computer stuff kit tricks of Topics 32.

3D Character modeling


How to make 3D Character modeling in Maya?

The character modelling is very tough to learn, but if you have passion and zeal, then you can make character modeling it is easy to do. You can go through our previous topics about 3D modeling, rigging, rendering, texturing of Maya tutorial of simple character model.

Character model in Maya, Rigging in Maya, Animation Tutorial
3D Character modeling | Screenshot - 1

First we need one image of human body like, neck, chest, hands, stomach, hips, legs and foot. It require two side human body to develop character model (Maya character modeling reference images).

Images, stomach, hips, legs, Maya tutorial stuff
3D Character modeling | Screenshot - 2

As we learn earlier about how to import image in Maya application, Import the image in the Front view panel and adjust it as per your requirement. After imported image then take square polygon object and start from neck to chest to hands, chest to stomach to hips to legs to foot.

Character rigging in Maya, Maya tips, Animation tips, Stuff
3D Character Rigging | Screenshot - 3

After created modeling then do texture the body with color settings, after that we need to make rigging the character by using some joints and Ik handles.

After fixed the joints from foot to neck or head, here we need to require accurate settings with axis like X, Y and Z. Some axis are shows other angles, so we need to change the orientation  or other tool like cometJointOrient();

MEL script Editor, MEL language, Character Rigging
3D Character Rigging | Screenshot - 4

The main important is correct axis point have to change it. The cometJointOrient need to download from internet and save it in to your computer, then go to Maya application and click the right side MEL and select Script Editor menu and upload the file name as “cometJointOrient” from your computer storage, then after go and type the script as “cometJointOrient ();” and press enter, after that you will appear one wizard with name as “cometJointOrient” as above Screenshot-4.

Here you need to start or test the axis point direction and change it as per your requirement.

Animation stuff, 3D Modeling, Rigging
3D Character Animation | Screenshot - 5

The cometJointOrient is essential to your task to get accurate rigging the character modeling for animation project.

If you want to know more about the subject of animation or Maya tips then go and search in search box and key the words of your related information subject.


Computer stuff kit tricks of Topics 30.


Glass in Maya – How to make Glass in Maya and usage method.

Lighting in Maya – Lighting for Animations by using options on lights.

Camera setup in Maya – How to insert camera in Maya.

Color settings in Maya - An object can make life of animation.

Blogger Custom Redirects trick


How to change old URL to new URL in blogger settings?

The blogger is most and helpful of our website or blog posts. Actually, when post the article or blog content, then it will generate unique URL of the website domain, example: (www .your webiste.com/article-url.html).

Now let’s start the procedure to change the old URL to New URL of your website post or pages.

website URL, Redirects URL, Blogger settings, Custom Redirects stuff
Blogger Custom Redirects | Screen shot -1

When we develop content and post the article public, in a few days you want to change the post article URL, then you should go to blogger login dashboard and click the left side posts option and find which you want to change the post article URL and click to open at the right side have few options like "Preview, Update, Post settings and Permalink so on".

Revert to draft, Post URL, Custom Redirects tips
Blogger Custom Redirects | Screen shot -2

If you see at old URL in the permalink option then you need to go Preview drop down list and select "Revert to draft" and now go back to post list menu. Again click the same URL post article and go to right side menu list and select the "Permalink", there have two options that is "Automatic Permalink" and "Custom Permalink".

Blogger post URL, Blogger URL not working, How to change URL
Blogger Custom Redirects | Screen shot -3

Now select the option "Custom Permalink", and change as you desire title or New URL name and click update. See the Sample screenshot-3 for your reference.

Post URL error, Blogger URL error, Change URL
Blogger Custom Redirects | Screen shot -4

The New URL address link work well, if you begin the today article no need to suffer and continue it, If you have changed the old URL used in few days or few months or years, the URL is not exist post content or article or 404 error, then see the screenshot-4 for your reference. If you don't want to see that errors, then again you have other task to change old URL to New URL settings in blogger.

Now go to the blogger dashboard "Settings" option and select the option “Errors and redirects” and have two types one is "Custom 404" and other one is "Custom redirects", now select the option "Custom redirects".

Blogger redirects URL, Change old URL, Change new URL
Blogger Custom Redirects | Screen shot -6

In the Custom redirect wizard appear with two options like "From:" and "To:", here you need to give Old URL in "From:" field and New URL in "To:" field. Only post article URL address not with your website homepage, it is already indicate with forward slash /. Now click "Permanent", if you like or temporary then click OK.

Here, finish the steps of your website post article URL "custom redirects blogger settings". It will work perfect of old URL to New URL redirects the posts content or article of your website posts.

If you want more related topics then go to search box and search keyword with your related information or subject.


Computer stuff kit tricks of Topics 31.


Robots txt and google search console - Robots txt syntax for google bot access.

AdSense Code and Crawling login access - Adsense is for run Ads to earn income.

How to do Hills and Tree rendering


How to create hills and tree rendering images?

The modelling can make objects like, chair, table, trees, leaf, hills, and so on… Modelling can do with 3D software like, Maya, Blender, Substainer, 3D Max, Modo, Carrara, massive, Seamless3D, Art of Illusion, POV-ray, K-3D, FaceGen, 3D Movie Maker, Imagine, SketchUp, Nuke and many more.

The best quality of animation or images can do in Maya application with some tools like polygon sphere, square, plane, cylinder and pipe. If you want to make hills and a tree then need to go menu list and select “plane” and scale it as per your requirement place.

Maya tutorials, Hills rendering, Animation Technical Stuff
Screen shot-1 | Plane | Extrude

Now you need to create hills, then select option is “Face” and where you want to make hills see the screen shot for your reference. Which are selecting the area and take option is to “Extrude” to take upwards like small or medium or high size of hills.

3D Modelling, Nuke, Blender
Screen shot -2 | Smooth | Press-3

The 3D view can check thoroughly how it looks when creating a video or render the images. Once created hills with the requirement then need to press key “3” for smooth. You can also keep lighting near the place like point light, area light, spot light and volume light. The most important accurate of the lighting part have every aspect of your project.

Images, reflections, attribute
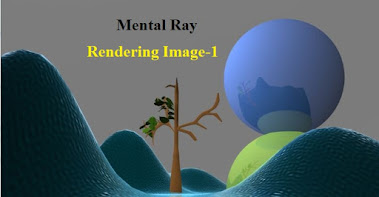
Screen shot - 3 | Mental Ray | Render image - 1

If you want hills with water or ocean then go to “OceanShader” to create it. You need to do some attribute of particular item to reflect or refraction of any object to look beautiful or nice images. In the attribute or short cut key is (Cntrl + A) to get wizard of particular object settings.

Rendering images, Display, Object settings
Screen shot - 4 | Mental Ray | Render Images-2

Need to do little bit experiment in channel box of feature adjustment making such object reflections point.

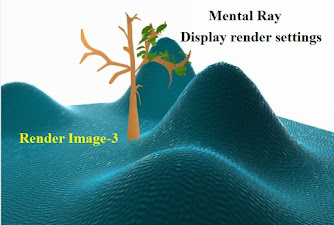
As we know after all created the best part is Display render settings to get output of your project. Let’s check in “Display rendering settings” for your reference purpose.

Quality, Maya tutorial, Computer
Screen shot - 5 | Mental ray | Render Image-3

The HD images or quality videos based on pixel resolutions to get good quality. See some rendering images of mental ray settings option in Maya applications. Some are with light effects, trees, ocean waves and many more. The quality comes with pixel width and height of image.


Computer stuff kit tricks of Topics 28.

Camera setup in Maya - Create the stories with story board.

Rigging in Maya - The main one is Joint Tool, Ik Handle Tool.

Glass in Maya - The entire glass you have to draw EP curve.

Lighting in Maya - Need to light “ON” by press the key “7”

Color settings in Maya - Color is to give the beauty of character.

Photoshop and Tool  - For best quality settings can use HD Images.


How to do 3d model of eyeball


How to make eyes 3d models in Maya?

The modeling 3d model of human eye of any object is required some reference images to develop the object structure, then need to do that go and search in internet and collect images with key word as “eyes transparent 3d modeling images” and download the images into your desktop or storage hard drive to use as reference in the Maya application modeling part.

head modeling in maya, Animation Technical Stuff, eye ball model
Screenshot-1 | Maya eyeball

Now open the Maya application software from your desktop which already installed Maya software.

After this go to save and give file of your project name ex: (modeling eye.ma) and in the application have four views, here select the front views to import the reference image which already downloaded from the internet. It is useful for reference image to develop the object with Maya tools.

Now go to perspective of 3d view and go to the Polygon tool and select the “Polygon Sphere”, and press “3” for smooth and press key “5” for grey color to object visibility.

eye ball model, 3d modeling eyes, stuff
Screenshot-2 | Polygon Sphere

Again select the object and press key “E” to rotate the object as per your requirement and go to attribute or channel box and select “Rotate X” then give number as (90 or -90) to look like eye ball.

photoreal eye, maya eyeball texture, stuff
Screenshot-3 | Object color settings

Now select the object and press right click with hold and select “face” option to select object area as circle, to know clear reference see the screen shot for your reference.

Maya eyeball texture, Maya Procedural Eye, stuff
Screenshot-4 | Final output Eyes rendering image

Before this give object with full color is “White” with type “Phong” and remaining selected circle area with color is black and other one is brown color in center place. See the screen shot to know the “Maya Procedural Eye” final output.

For Maya eyeball , realistic eyes Maya, Maya eyeball texture, eye ball model, 3d model of eyeball, 3d modeling eyes.


Computer stuff kit tricks of Topics 29.

Camera setup in Maya – How to create animate video film.

Lighting in Maya – What type of lighting are there in maya.

Color settings in Maya – How to make object with color.

Render settings in Maya – What is the render settings of quality image or video.

Polygon Sphere in Maya – What is polygon Sphere in maya application.

Rigging in Maya – How to do rigging in maya application.

Glass in Maya – How to make glass in maya software.